If your source is H264 or AVCHD please see Editing AVCHD with Cinelerra.
The open source encoder x264 patched with the --tff and --bff and --nal-hrd patches may be used to encode video for HD-DVD and Blu-ray hardware players. These patches are available at the sites
Since the Blu-ray h264 stream specification is a superset of the HD-DVD specification, we may use a single video encode compliant to the HD-DVD specifcations for both kinds of disks. This tutorial covers the creation of 3xDVD disks for the Toshiba HD-DVD players and BD5 disks for Blu-ray players.
$ mkdir capture
$ cd capture
$ dvgrab -fhdv -noavc -s0 src
and then press play on the camcorder. This will result in one huge file src001.m2t being created on your harddisk. This is the HDV mpeg2 transport stream file from the camera. You can test it with mplayer.
It appears that most m2t files produced by dvgrab have incomplete packets at the very beginning which messes up the sound synchronization in Cinelerra. To fix this demultiplex using ProjectX into separate m2v and mp2 files.
$ java -jar ProjectX.jar x001.m2tIt is important to use ProjectX for the demultiplexing because it corrects the extracted audio to maintain synchonization with the video. Remultiplex using mplex and the command
$ mplex -f3 x001.m2v x001.mp2 -r 28000 -b 800 -o x001.mpg
$ mpeg3toc -v x001.mpg x001.toc
to create a clean program stream mpeg file. This will fix the sound synchonization problems that occur from importing the m2t file directly into Cinelerra.

Then open the toc files created above. After you are done with editing, the project needs to be rendered. To do this I use the script pipe-x264 which should be executable and in your path. The following simplified script will also work.
#!/bin/sh
y4mtoyuv |
x264 --fps 30000/1001 --sar 4:3 --pass 1 --bitrate 10000 \
    --stats $1.stats --level 4.1 --keyint 14 --min-keyint 2 \
    --ref 2 --mixed-refs --bframes 2 --weightb --direct spatial \
    --interlaced --tff --deblock -1:-1 --subme 5 \
    --partitions p8x8,b8x8,i4x4,i8x8 --8x8dct \
    --ipratio 1.1 --pbratio 1.1 \
    --vbv-bufsize 14475 --vbv-maxrate 17500 --qcomp 0.5 \
    --merange 12 --threads auto --progress --no-psnr \
    --no-ssim --output $1 /dev/stdin 1440x1080 \
    --mvrange 511 --aud --nal-hrd
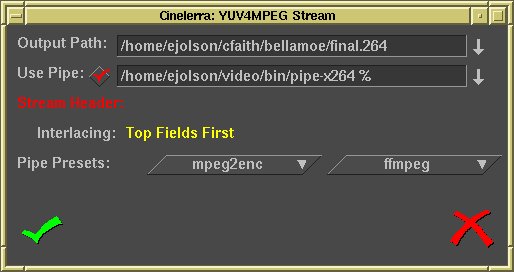
Select File->Render
and choose the YUV4MPEG Stream file format. Click on
the wrench to set the video rendering options. Select
use pipe and enter pipe-x264 %
in the following box. Make sure the extention of the
file to render to is .264
and render the video.
Render the audio by
selecting File->Render and choosing Microsoft WAV
as the file format. Screen grabs of the rendering options are


Encode the audio track using the commands
$ ffmpeg -i final.wav -ab 192000 final.ac3You now have a primative h264 video stream and a primative ac3 audio stream that need to be multiplexed and burned to a disk.
$ h264fix -ibellamohd.264 -obellamohdn.264There are other options for h264fix, but the defaults are what we want.
Alternatively, transfer the h264 video and the ac3 audio files from Linux to Windows. Samba works well for this. Before multiplexing the h264 video stream needs a little modification so it will work with the hardware decoders in the HD-DVD and Blu-ray players. Run h264info on the h264 stream with only the "add PPS every picture" option selected. Press start. When the start button is lit again h264info is finished and can be closed by clicking on the x at the top of the screen. A screen grab of h264info is


You do not need Movie Factory 6 HD Power Pack, because the ability to handle transport streams with h264 video is included with Full Patch 2. The library H264VDecHPDll.dll for decoding h264 video that comes with Full Patch 2 seems to cause frequent program faults. These faults went away after I installed K-Lite Codec Pack Basic. It is possible that Movie Factory prefers Direct Show source filters if they are available.
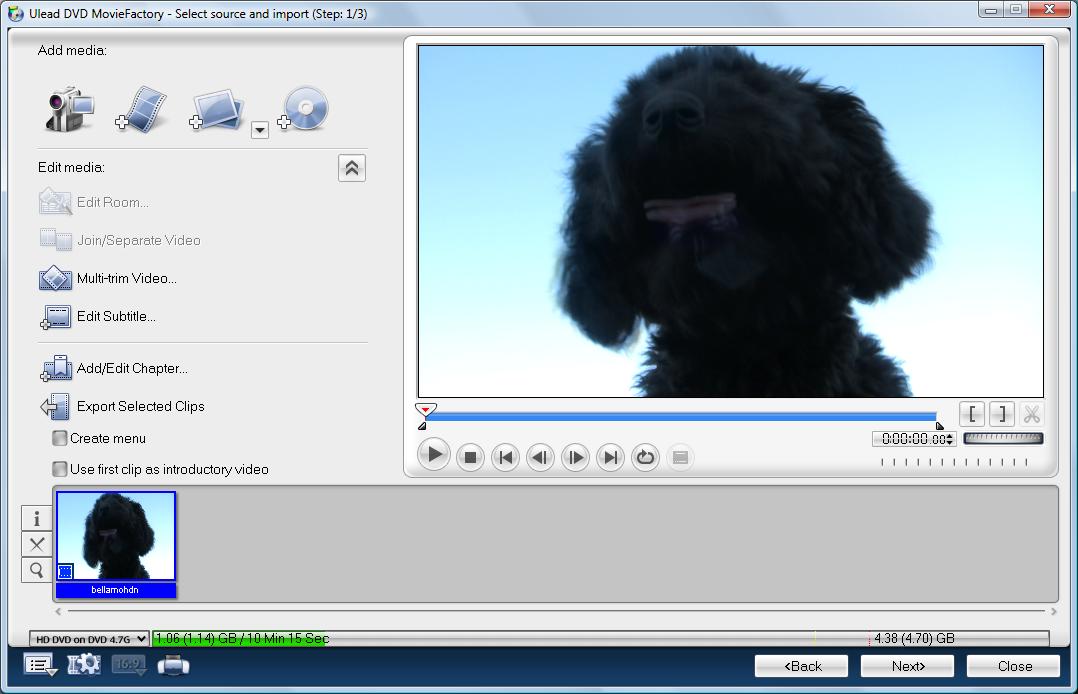
Start Movie Factory 6 Plus and select HD DVD Standard. Drag the .ts file onto the time line, set the chapter points and click burn. The program should start remultiplexing the EVO files almost immediately without transcoding and start burning the disk within 10 minutes. After the burn is finishing, verify the disk contains the original h264 video and not transcoded mpeg2 video by loading the EVO files from the disk into tsmuxer. Screen grabs showing this procedure are given by