Disable output scaling in mencoder by specifying -apsect <far> where <far> is the frame aspect ratio of the video source. For example if the source is 720x480 DV then <far> should be 3:2. If the source is 1440x1080 HDV then <far> should be 4:3. If the source is 1920x1080 AVCHD then <far> should be 16:9.
Here is how to start mencoder for grabbing 720x480 frames from DV source.
$ mencoder -aspect 3:2 -vf screenshot src001.aviHere is an example for grabbing a frame from 1440x1080 AVCHD source.
$ mencoder -fps 30000/1001 -aspect 4:3 \
    -vf screenshot 20080814183517.m2ts
Note that -fps 30000/1001 may need to be specified explicity for
mencoder to display the video, because some camcorder AVCHD files
don't include the frame rate information.
Setting the display aspect ratio to be the same as the frame aspect ratio prevents mplayer from rescaling the frame grabs. We then deinterlace and rescale the frame grabs using Gimp. An alternative is to have mplayer do the deinterlacing and scaling before the frame grab. This works well for standard definition but not so well for high definition because it is too slow. Deinterlace and rescale with mplayer using
$ mencoder -vf kerndeint,screenshot src001.aviWe procede assuming the deinterlacing and rescaling will be done in Gimp.
Use the left, right, up, down, space and . keys to find a good frame and press s to write it to disk. The frame grab will be called shot0001.png. Load this image into gimp using
$ gimp shot0001.png &Deinterlace the frame by right clicking on the image and selecting
Filters->Enhance->Deinterlace...
It doesn't matter much whether Keep odd fields or Keep even fields
is selected. Choose which looks better, if there is a difference.
Note that deinterlacing an image that is not interlaced will reduce
the vertical resolution.
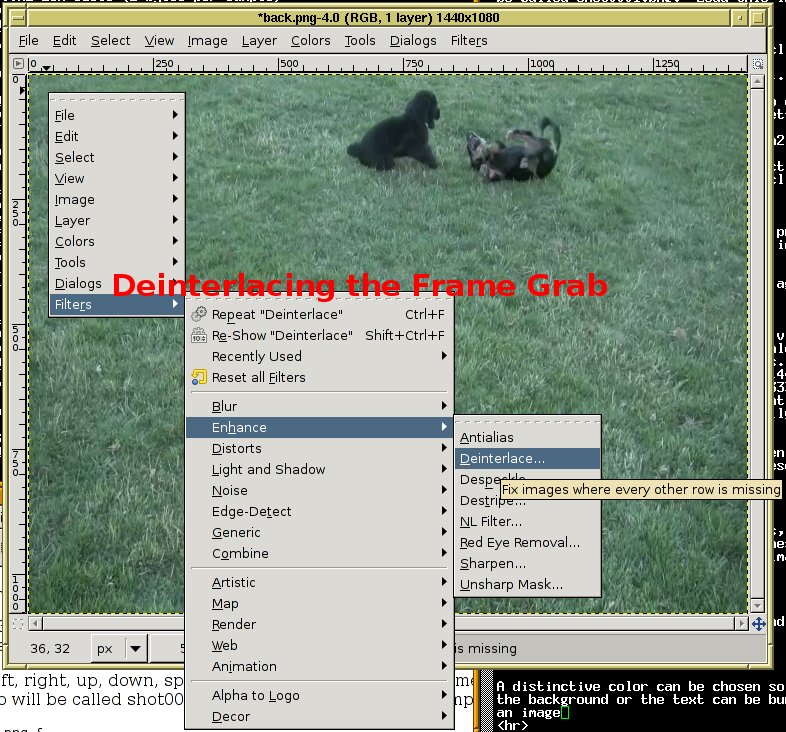
Image->Scale Image...
Change the X resolution to 300 and press Scale. This should only
change the resolution setting. No scaling should take place.
Right click on the image and again select
Image->Scale Image...
If your background image came from video source you will need to
correct the aspect ratio as you scale it. In this case
unlock the Width and Height entries.
In the image came from widescreen source set Width to 8.443 inches
and Height to 4.750 inches.
For fullscreen set Width to 6.333 inches and Height to 4.750 inches.
Otherwise leave the Width and Height locked and select Height to 4.750
inches. The Width will automatically change when you press the tab key.
Click on Scale to rescale the image.
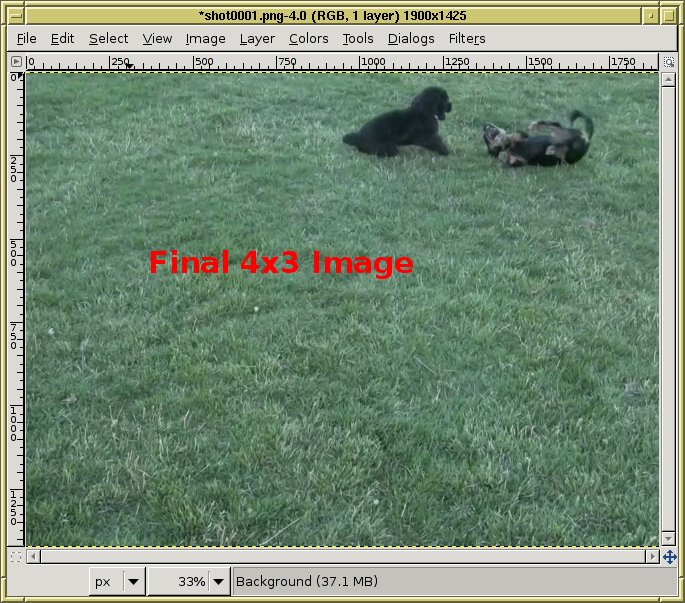
Since menus should be 4x3 fullscreen to avoid the bugs in rescaling the button overlays, crop any image that is too wide to 4x3 by selecting
Image->Canvas Size...
Unlock the Width and Height entries, set the units to inches
and specify the Width at 6.333 inches. Position the image in the window
and click on Resize. Now flatten the image by right clicking and
selecting
Image->Flatten Image
The result should be an image suitable for use as the background.

In the example being created here, lets suppose there are two videos and we want to place a thumbnail of each video with an way to select between them. For each clip use mplayer and gimp as described above to create a deinterlaced frame grab suitable for use as a thumbnail. Rescale each image to correct the aspect ratio and make it a good size for the thumbnails.
In our example the frame grabs were from 16x9 video. We set the height to 1.250 inches, the width to 2.222 inches and rescale. Note that I also color correct and brighten the thumbnails to make them stand out more from the background.
Select a thumbnail. Press ctrl-C to copy it. Move the mouse to the window containing the background image and press ctrl-V to paste it. The press ctrl-L to bring up the Layers menu. Right click on the Floating Selection in the Layers window and select new layer. Do this for each thumbnail. Now use the mouse to arrange the thumbnails in the image.
In the Layers window right click on each thumbnail layer and duplicate the layer. Drag the black color into each original thumbnail layer image that is below each duplicate. Add text below the thumbnails describing each video. Duplicate each of the thumbnail text description layers.
At this point the Layers windows and Image windows should look like

Now turn off viewing the background image, the thumbnail images and one copy of the thumbnail text description layers.

Press ctrl-M in the image windows and select Expand as Necessary in the Layers Merge Options and click Merge. Duplicate the merged layer in the Layers window. Turn off the original layer.
Select the copy in the Layers window. Then right click on the image and select
Colors->Invert
The text should turn from black to white.

Now turn of the layer and turn back on the black version of the layer. Create a new layer underneath that layer that is entirely white. Press ctrl-M again to merge the layers. Finally right click on the image and select
Filters->Blur->Gaussian Blur...
Choose a radius of 25 px and click on Okay. Right click on the image
and select
Colors->Curves...
In the Adjust Color Curves window shape the curve as shown so that
the lettering is a dark fuzzy black color.

Go to the Layers menu and select Mode Multiply for this layer. Turn back on all layers except the duplicate of the snapshot descriptions. The image should look like

Save the image as cover.png. Gimp will ask if you want to export the image. Click Yes. Then save the image as cover.xcf.
Now open cover.png in a new image window using
File->Open...
The cover is needs to be cropped so that it is 5.5 inches wide.
Select
Image->Canvas Size...
unlock the width from the height and specify a height of 5.5 inches.
Position the image so that none of the text is chopped off and
click Resize. Select
File->Save
and press ctrl-W to close the window.
The cover is finished. Note that this cover is sized to fit
a CD case rather the the DVD case.
Return to the cover.xcf window to make the DVD menu. Turn off viewing all the layers except the copies of the thumbnail descriptions. Merge the thumbnail descriptions to one layer using ctrl-M with Expand as necessary. Invert the color to make the text white. Then select
Colors->Curves...
Change the color by setting Channel to Green, Red or
Blue and adjusting each curve.

Create a transparent layer beneath the thumbnail descriptions. Select this layer in the Layers window. Use the Pencil Tool and draw black lines to connect the letters that will form each button. The black lines should appear behind the letters.

This is the button highlight layer. Each group of connected letters will form a button in the menu. These buttons will be highlited with the chosen color when selected and white when they are not selected. Save the image to menu.xcf.
Merge the highlight layers and then turn that layer off. Turn the other layers back on and merge them. Rescale the image to 720x480 and save it as menu.png.

Delete the layer that is being displayed by right clicking on it in the Layers windows end selecting Delete Layer. Turn on the remaining highlight layer. Select
Image->Mode->Indexed...
Choose 3 for the maximum number of colors in the palette and
click Okay.
The palette must contain 3 colors plus transparency in order
to be used by spumux for the button highlights.
Save the image as menuh.png.
Close the Gimp.
Filters->Blur->Gaussian Blur...
Unlock Horizontal and Vertical. Enter 0 px for
horizontal and 1 px for vertical.

Click Okay. Then save the image and exit the Gimp.
$ ./mkmenu-dvd menu.pngThe output from running this command should look like
Transcoding menu.png to menu.mpg....
16000+0 records in
16000+0 records out
64000 bytes (64 kB) copied, 0.0873948 s, 732 kB/s
   INFO: [ppmtoy4m] Command-line Parameters:
   INFO: [ppmtoy4m]              framerate:  30000:1001
   INFO: [ppmtoy4m]     pixel aspect ratio:  1:1
   INFO: [ppmtoy4m]          pixel packing:  RGB
   INFO: [ppmtoy4m]              interlace:  none/progressive
   INFO: [ppmtoy4m]         starting frame:  0
   INFO: [ppmtoy4m]            # of frames:  10, repeat last frame until done
   INFO: [ppmtoy4m]     chroma subsampling:  4:2:0 MPEG-2 (horiz. cositing)
FFmpeg version git-27f11a1, Copyright (c) 2000-2009 Fabrice Bellard, et al.
  configuration: --enable-gpl --enable-version3 --disable-debug
  --enable-libxvid --enable-libx264 --enable-libfaac
  --enable-libfaad --enable-libmp3lame --enable-libopencore-amrnb
  --enable-libopencore-amrwb --enable-nonfree --enable-shared
  libavutil     50. 3. 0 / 50. 3. 0
  libavcodec    52.32. 0 / 52.32. 0
  libavformat   52.37. 0 / 52.37. 0
  libavdevice   52. 2. 0 / 52. 2. 0
  libswscale     0. 7. 1 /  0. 7. 1
  built on Aug  5 2009 00:26:59, gcc: 4.3.2
   INFO: [ppmtoy4m] Output Stream parameters:
   INFO: [ppmtoy4m]     frame size:  720x480 pixels (518400 bytes)
   INFO: [ppmtoy4m]         chroma:  4:2:0 MPEG-2 (horiz. cositing)
   INFO: [ppmtoy4m]     frame rate:  30000/1001 fps (~29.970030)
   INFO: [ppmtoy4m]      interlace:  none/progressive
   INFO: [ppmtoy4m]   sample aspect ratio:  1:1
Input #0, yuv4mpegpipe, from '/dev/stdin':
  Duration: N/A, bitrate: N/A
    Stream #0.0: Video: rawvideo, yuv420p, 720x480, PAR 1:1 DAR 3:2, 29.97 tbr,
29.97 tbn, 29.97 tbc
Assuming NTSC for target.
Output #0, dvd, to 'menu.m2v':
    Stream #0.0: Video: mpeg2video, yuv420p, 720x480 [PAR 8:9 DAR 4:3], q=2-31,
6000 kb/s, 90k tbn, 29.97 tbc
Stream mapping:
  Stream #0.0 -> #0.0
frame=   10p fps=  0 q=2.0 Lsize=     194kB time=0.30 bitrate=5292.2kbits/s
video:188kB audio:0kB global headers:0kB muxing overhead 3.295046%
FFmpeg version git-27f11a1, Copyright (c) 2000-2009 Fabrice Bellard, et al.
  configuration: --enable-gpl --enable-version3 --disable-debug
  --enable-libxvid --enable-libx264 --enable-libfaac
  --enable-libfaad --enable-libmp3lame --enable-libopencore-amrnb
  --enable-libopencore-amrwb --enable-nonfree --enable-shared
  libavutil     50. 3. 0 / 50. 3. 0
  libavcodec    52.32. 0 / 52.32. 0
  libavformat   52.37. 0 / 52.37. 0
  libavdevice   52. 2. 0 / 52. 2. 0
  libswscale     0. 7. 1 /  0. 7. 1
  built on Aug  5 2009 00:26:59, gcc: 4.3.2
Input #0, wav, from 'menu.wav':
  Duration: 00:00:00.33, bitrate: 1535 kb/s
    Stream #0.0: Audio: pcm_s16le, 48000 Hz, 2 channels, s16, 1536 kb/s

Seems stream 0 codec frame rate differs from container frame rate: 59.94
  (60000/1001) -> 29.97 (30000/1001)
Input #1, mpeg, from 'menu.m2v':
  Duration: 00:00:00.26, start: 0.500000, bitrate: 5953 kb/s
    Stream #1.0[0x1e0]: Video: mpeg2video, yuv420p, 720x480 [PAR 8:9 DAR 4:3],
9000 kb/s, 29.97 tbr, 90k tbn, 59.94 tbc
Assuming NTSC for target.
[ac3 @ 0x8c9d970]No channel layout specified. The encoder will guess the
layout, but it might be incorrect.
Output #0, dvd, to 'menub.mpg':
    Stream #0.0: Video: mpeg2video, yuv420p, 720x480 [PAR 8:9 DAR 4:3], q=2-31,
6000 kb/s, 90k tbn, 29.97 tbc
    Stream #0.1: Audio: ac3, 48000 Hz, stereo, s16, 128 kb/s
Stream mapping:
  Stream #1.0 -> #0.0
  Stream #0.0 -> #0.1
Press [q] to stop encoding
frame=   10p fps=  0 q=2.0 Lsize=     212kB time=0.30 bitrate=5783.2kbits/s
video:200kB audio:6kB global headers:0kB muxing overhead 3.229733%
DVDAuthor::spumux, version 0.6.14.
Build options: gnugetopt magick iconv freetype fribidi
Send bugs to

INFO: Locale=C
INFO: Converting filenames to ANSI_X3.4-1968
STAT: 0:00:00.000INFO: Picture menuh.png had 4 colors
INFO: Picture menuh.png had 4 colors
INFO: Constructing blank img
INFO: Autodetect 0 = 135x358-364x376
INFO: Autodetect 1 = 442x358-615x376
INFO: Pickbuttongroups, success with 1 groups, useimg=1
INFO: Found EOF in .sub file.
INFO: Max_sub_size=1154
INFO: 1 subtitles added, 0 subtitles skipped, stream: 32, offset: 0.50

Statistics:
- Processed 0 subtitles.
- The longest display line had -1 characters.
- The maximum number of displayed lines was 0.
- The normal display height of the font arial.ttf was 0.
- The bottom display height of the font arial.ttf was 0.
- The biggest subtitle box had 1154 bytes.
Note that the lines
INFO: Autodetect 0 = 135x358-364x376
INFO: Autodetect 1 = 442x358-615x376
indicate that 2 buttons were found. This is a good check that things went well. The resulting file menu.mpg is can be used as a menu in dvdauthor.
$ pngquant 4 <menuh-rgb.png >menuh.pngto requantize the image to 4 colors.