$ mkdir capture
$ cd capture
$ dvgrab -fraw -noavc src
and then press play on the camcorder. This will result in the files src001.dv, src002.dv and so forth being created in the capture directory. These are the DV stream files dumped direct from the camera.
We dump from the camera to a raw format file rather than directly multiplexing the DV video to an avi file during capture. This is to avoid bugs that sometimes manifest when the DV source suddenly switches between 16bit and 12bit audio or between standard and widescreen aspect ratios. After the files are captured, start kino with the command
$ kino src*.dvto check the raw files. At this point we will do some preliminary editing with Kino and if necessary some more sophisticated editing later with Cinelerra.
For a simple project we will transcode each individual clip to a DVD compatible mpeg2 program stream and then join them together in a single title using dvdauthor. For a more complicated project we will paste the clips into Cinelerra edit them and then transcode the resulting video to a single DVD compatible mpeg2 program stream through a yuv4mpeg2 pipeline.
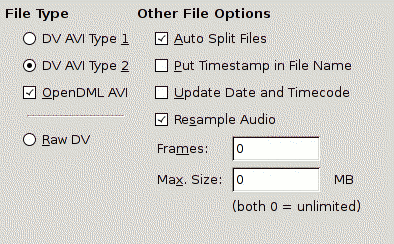
It is important to select resample audio to avoid clicks that might occur when editing the files with Cinelerra. Since inexpensive camcorders have audio clocks which are not locked to the video clock, the exact number of audio samples for every frame of video usually does not correspond exactly to 48Khz. A click results when extra audio samples are thrown away to keep the sound in sync. Resampling corrects the audio track so it is locked to the video frame rate at exactly 48Khz. Since the audio is not in a compressed format nothing really bad happens to it with the resampling. Note that there is no transcoding of video at this step so it should go pretty quickly limited only by disk speed.
<dvdauthor>
    <vmgm>
        <menus>
            <video aspect="16:9" />
            <pgc entry="title">
            <vob file="header.mpg" />
            <post>jump titleset 1 menu;</post>
            </pgc>
        </menus>
    </vmgm>
    <titleset>
        <menus>
            <video aspect="4:3" />
            <pgc entry="root">
                <vob file="menu-1.mpg" />
                <button>jump title 1 chapter 1;</button>
                <button>jump title 1 chapter 2;</button>
                <button>jump title 1 chapter 3;</button>
                <button>jump title 1 chapter 4;</button>
                <button>jump title 1 chapter 5;</button>
                <button>jump title 1 chapter 6;</button>
                <button>jump title 1 chapter 7;</button>
                <button>jump title 1 chapter 8;</button>
                <button>jump title 1 chapter 9;</button>
                <button>jump menu 2;</button>
            </pgc>
            <pgc>
                <vob file="menu-2.mpg" />
                <button>jump title 1 chapter 10;</button>
                <button>jump title 1 chapter 11;</button>
                <button>jump title 1 chapter 12;</button>
                <button>jump title 1 chapter 13;</button>
                <button>jump menu 1;</button>
            </pgc>
        </menus>
        <titles>
            <video aspect="16:9" />
            <pgc>
                <vob file="g001.mpg" />
                <vob file="g002.mpg" />
                <vob file="g003.mpg" />
                <vob file="g004.mpg" />
                <vob file="g005.mpg" />
                <vob file="g006.mpg" />
                <vob file="g007.mpg" />
                <vob file="g008.mpg" />
                <vob file="g009.mpg" />
                <vob file="g010.mpg" />
                <vob file="g011.mpg" />
                <vob file="g012.mpg" />
                <vob file="g013.mpg" />
                <post>call menu;</post>
            </pgc>
        </titles>
    </titleset>
</dvdauthor>
Note that the aspect ratio of the menus is set to 4:3 aspect ratio
even though the main video is 16:9 aspect ratio. This is to
overcome a bug in dvdauthor that seems to tags the button
overlays as 4:3.
#!/bin/sh
yuvcorrect -T INTERLACED_BOTTOM_FIRST |
mpeg2enc -M0 -nn -a3 -f8 -G18 -b7000 -V230 -q9 -o $1
Similar scripts can be used to pipe the output of Cinelerra into ffmpeg and mencoder. Render the audio track as a wav file. Then multiplex the video and audio together using the commands
$ toolame -b224 -s48 final.wav final.m2a
$ mplex -f8 final.m2v final.m2a -o final.mpg
and make a list of chapter start times as
chapters="0,1:00,3:14.35,6:14.52,8:08.408,9:00,10:00,11:00,12:00,13:32.12,
    14:25,15:10,18:23.15"
Let's again assume you have
two menus called menu-1.mpg
and menu-2.mpg and an introductory logo called header.mpg.
The dvd.xml file for dvdauthor should now look like
<dvdauthor>
    <vmgm>
        <menus>
            <video aspect="16:9" />
            <pgc entry="title">
            <vob file="header.mpg" />
            <post>jump titleset 1 menu;</post>
            </pgc>
        </menus>
    </vmgm>
    <titleset>
        <menus>
            <video aspect="4:3" />
            <pgc entry="root">
                <vob file="menu-1.mpg" />
                <button>jump title 1 chapter 1;</button>
                <button>jump title 1 chapter 2;</button>
                <button>jump title 1 chapter 3;</button>
                <button>jump title 1 chapter 4;</button>
                <button>jump title 1 chapter 5;</button>
                <button>jump title 1 chapter 6;</button>
                <button>jump title 1 chapter 7;</button>
                <button>jump title 1 chapter 8;</button>
                <button>jump title 1 chapter 9;</button>
                <button>jump menu 2;</button>
            </pgc>
            <pgc>
                <vob file="menu-2.mpg" />
                <button>jump title 1 chapter 10;</button>
                <button>jump title 1 chapter 11;</button>
                <button>jump title 1 chapter 12;</button>
                <button>jump title 1 chapter 13;</button>
                <button>jump menu 1;</button>
            </pgc>
        </menus>
        <titles>
            <video aspect="16:9" />
            <pgc>
                <vob file="final.mpg"
chapters="0,1:00,3:14.35,6:14.52,8:08.408,9:00,10:00,11:00,12:00,13:32.12,
14:25,15:10,18:23.15" />
                <post>call menu;</post>
            </pgc>
        </titles>
    </titleset>
</dvdauthor>
Create the DVD file structure with the command
$ dvdauthor -o final -x dvd.xmlYou can check your DVD image using the command
$ vlc final
$ growisofs -dvd-compat -dvd-video -Z/dev/dvd disk1The final disk should play on most DVD players.